Pertronix Ignition Products
Can I change the length of the Ignitor™ wires?
Yes, the Ignitor wire length may be tailored to your specific needs. Occasionally the wires may need to be extended. We recommend that a 20-gauge copper strand wire be used. Make sure that all splices are cleaned, secure and insulated. PerTronix offers a simple wire extension kit (part number 2005) which includes all the necessary connections.
Can I mount the Flame-Thrower coil sideways or upside down?
Flame-Thrower coils are made with two different internal materials, oil and epoxy. Epoxy filled coils have a cured resin which supports the coil internal winding's and they can be mounted in any direction. Oil filled coils should always mounted upright to prevent a potential leak of critical fluid as the coil heats up and cools down.
Can I run a MSD box or other CD unit with the Ignitor™ or Flame-Thrower Billet distributor ? How do I hook it up?
Our Ignitor and Ignitor II electronic ignition systems and Flame-Thrower distributors are compatible with most capacitive discharge boxes. Only Ignitor III electronic conversions and Ignitor III equipped Flame-Thrower distributors cannot be used with other company's CD systems. The Ignitor III can be used with our Digital HP CD box.
Wiring for these Ignition boxes typically follows the instructions for point type ignitions. The red Ignitor module wire should be connected to a 12V ignition power source. The attached diagram applies to MSD 6 series ignitions.
Can I static time the Ignitor Ignition?
Only Ignitor systems and not the Ignitor II or III can be static timed. On negative ground applications, the easiest way to static time the distributor is to attach the clip lead of a 12 volt test light to the engine ground. Probe the coil negative terminal with the test light. The intensity of the light will be dim when the module is in a dwell state. The moment the light goes bright is the fire point of the Ignitor.
Does PerTronix make kits for unique or custom applications?
Yes. We are constantly working on developing new kits to provide coverage in many areas. Additionally many applications we have converted are extremely rare and only done with customer supplied distributors. For more specific information regarding our custom conversions please create a service ticket with your details and one of our technicians will reply to you. Feel free to attach pictures to help us determine what options you have.
Does PerTronix work with aftermarket EFI systems?
PerTronix Ignitor and Ignitor II will work with many aftermarket Electronic Fuel Injection(EFI) systems. As long as the EFI system can be triggered with a signal from the ignition coil negative it will work with the Ignitor or Ignitor II. Some EFI systems just call this a points signal.
Some EFI systems needs a sine wave signal from something like a magnetic pick up distributor to be triggered. We also offer these type distributors for many engine applications.
Most all EFI systems will work with our Digital HP box for maximum performance. From the Digital HP box we offer a 12 volt square wave signal, which will trigger most EFI systems. The Digital HP can also be made to simulate the 12V pulse signal from the ignition coil negative.
The Ignitor III will not work with a EFI system because of the multiple strikes that happen on coil negative. You could add our digital HP box to allow the Ignitor III to work your EFI system. Or switch the Ignitor III to our Ignitor or Ignitor II systems.
How difficult is it to install an Ignitor™ conversion kit?
The Ignitor fits entirely inside the distributor, and in most cases installs quicker than points. There are no “black boxes” or complicated wiring. Simply install the kit into the distributor attach the two wires to the appropriate location, and you’re done. Some applications may require a little more work, which may add to the level of difficulty. We have some helpful installation videos of our most popular kits which can be viewed here.
How do I bypass my resistor wire?
Bypassing a resistor wire isn't always the easiest job. You have to find the start point of the resistor wire and run a new 12-14 gauge wire down to coil positive. You will not need to install any fuses in this line.
Depending on the application digging through the wiring harness is a pain. We have made that job easier with our Power relay. This will make bypassing the resistor wire a 10 min job. It's part number: 2001
http://shop.pertronix.com/pertronix-2001-ignition-power-relay-kit.html#.W5r5iKZKiUk
How do I check my coils resistance?
Label the wires attached to the coil terminals and note their appropriate location. Make sure that the ignition switch is off and disconnect all wires from the coil. Adjust your meter to the lowest ohm scale. If you are using an analog style meter make sure to zero the needle.
Measure from the negative terminal to the positive terminal. Make sure that the terminals are clean.
How do I know if I have a positive ground or negative ground Ignitor?
To figure this out, a quick look at the two wires on the Ignitor's is all that is needed.
If you have a Red wire and Black wire, you have a negative ground Ignitor.
If you have a Black wire and Black W/white tracer wire, you have a positive ground Ignitor.
Help Topics: Ignition General Help, Ignitor Application Inquiry, Warranty.
How do I properly check my power and grounds?
The following test should be performed only on negative ground applications. The following test will find any resistance in your wiring harness.
Loaded voltage test
Ground test
How do I find a Resistor wire
How do I test a negative ground Ignitor module?
Only Ignitor modules can be tested with the following steps. Ignitor II and Ignitor III modules should not be tested in the same manner.
Negative ground modules have one red and one black wire.
Open the attachment below and follow the directions on it.
For additional support after performing these test contact the technical support line at 909-599-5955 Ext. 1
How do I test a positive ground Ignitor module?
Only positive ground Ignitor modules can be tested with the following steps.
Negative ground modules have one red and one black wire.
Open the attachment below and follow the directions on it.
For additional support after performing these test contact the technical support line at 909-599-5955 Ext. 1
How do I wire the Ignitor or Ignitor II ignition system to my Mercedes Ignition Box?
Mercedes used a transistorized ignition system for many years. The Ignitor's can completely eliminate these systems or work in conjunction with the transistorized systems. Below is a diagram that will help with wiring the Ignitor's up to the transistorized system.
How do I wire the Ignitor or Ignitor II ignition system to my Porsche CD ignition box?
Special wiring is necessary with factory installed Porsche CD ignition systems. Click on the diagram below to view the proper Ignitor wiring.
How do I.D. my old Ignitor system in my distributor?
First you want to figure out if you have a Ignitor, Ignitor II, or Ignitor III. This can be done by the label on the part.
- Ignitor label will say Ignitor; Also the Ignitor is made of black epoxy.
- Ignitor II label will say Ignitor II; Also the Ignitor II is made of red epoxy.
- Ignitor III label will say Ignitor III; Also the Ignitor III will have a small dial on top.
Part numbers for the Ignitor kits ARE NOT found on any the labels on the Ignitor's. You should find a part number stamped on the mounting plate the ignitor is attached. If the Ignitor has more then one mounting plate check both plates for a part number. If the plate is not stamped you should find a part number on the magnet ring that is under the rotor. If the ring doesn't have a part number then normally that means we only have one option for the application. So, we just need to know the application to figure out the part number.
Some Ignitor plates are stamped with a combination of numbers we have listed some examples below:
- Plate is stamped 1541-61. For a 4 cylinder engine will take Ignitor part number: 1541 and 6 cylinder engine will take Ignitor part number: 1561.
- Plate is stamped 1542-62. For a 4 cylinder engine will take Ignitor part number: 1542 and 6 cylinder engine will take Ignitor part number: 1562.
- Plate is stamped 1581-82. If you have a clip down distributor cap it will take part number: 1581. If you have a screw down distributor cap you will need part number: 1582.
I can't find my application in your Catalog / Application Guide?
If you can’t find your application in our Catalog / Application Guide, it does not mean that it's not available. We have many kits that have been developed for distributors and applications not listed in the Application guide. You may call our technical support line at 909-599-5955 Ext. 1 for additional help, or create an application ticket with your details and one of our technicians will reply to you. The more information you can supply about your vehicle or equipment the better.
Is the Ignitor™ a "universal" electronic ignition conversion?
The Ignitor electronic ignition is far from being universal. Each kit is designed specifically for the distributor type. However, our kits will often fit many distributors from the same manufacturer. A kit that has been designed for a particular distributor type may also fit other distributors that use the same point set, cap and rotor.
My tachometer is not functioning or is inaccurate after installing the Ignition system.
Occasionally after upgrading to electronic ignition, some tachometers experience compatibility issues. In most cases we are able to get the tachometer to function again using one of the two methods. There are two basic forms of tachometers we encounter. The first and most popular uses the coil negative signal to determine RPM. The second is wired inline with the primary ignition circuit and registers RPM off the current. For tachometers that use coil negative signal follow the attached instructions. For current registered tachs read the attached document titled Current Tachs.
Rotor not seating down on 1146A or 91146A kit.
Part number: 1146A and 91146A: The magnet ring in these kits can be a very tight fit on some distributor shafts. We have had reports of customers sanding the rotor and have seen some poor information on the internet that sanding the rotor is needed.
Sanding the rotor is not needed and a sign of another issue.
The reason the rotor is not fitting correctly is because the ring is not pressed down all the way. We know the ring can be a tight fit on some distributors. In these cases something might be needed to help get more force on the sleeve to press it into place. We recommend a deep socket and your body weight to get the sleeve down. In rare cases you might need to tap the socket with a hammer to get the ring seated correctly. When the ring is down all the way the distance from the top of the ring to top of the distributor shaft will be roughly .460".
We have attached some pictures below to show a sleeve that is not seated all the way down and one that is seated completely. The ruler in the picture is for reference.
Since I have installed the Ignitor™ the engine won’t start. What can I check?
The first step in troubleshooting involves answering a few questions.
- Do you have the correct kit for your application?
- Did the Ignitor install without any modification?
- Was the Ignitor installed according to the instructions?
- Did the engine run prior to the installation of the Ignitor?
If you answered "NO" to any of the previous questions, go back and correct the condition before proceeding. If the answer to these questions is “YES”, then review some additional common solutions to a no start condition.
- The position in which the Ignitor red wire is attached to is not supplying sufficient voltage.
- The air gap between the module and magnet sleeve is too great.
- The ground wire inside the distributor is not connected.
- The wire connections are not tight.
- The polarity is not correct.
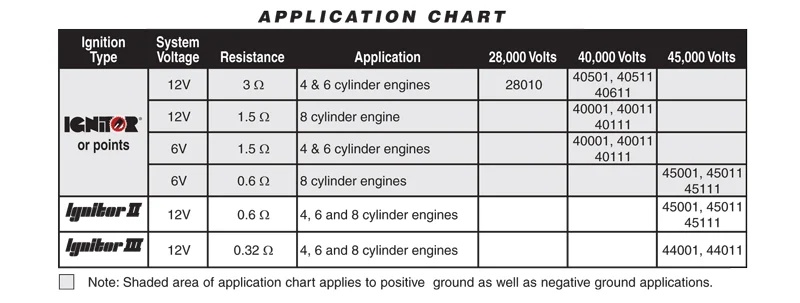
What applications are covered with the PerTronix Flame-Thrower™ coils?
Our line of Flame-Thrower coils are specifically designed to complement our Ignitor, Ignitor II and Ignitor III ignition systems. The chart below outlines the appropriate coil to use with each type of Ignition and the various voltages.
What is the warranty on PerTronix products?
All PerTronix products are guaranteed to the original purchaser to be free of defects in materials and workmanship.
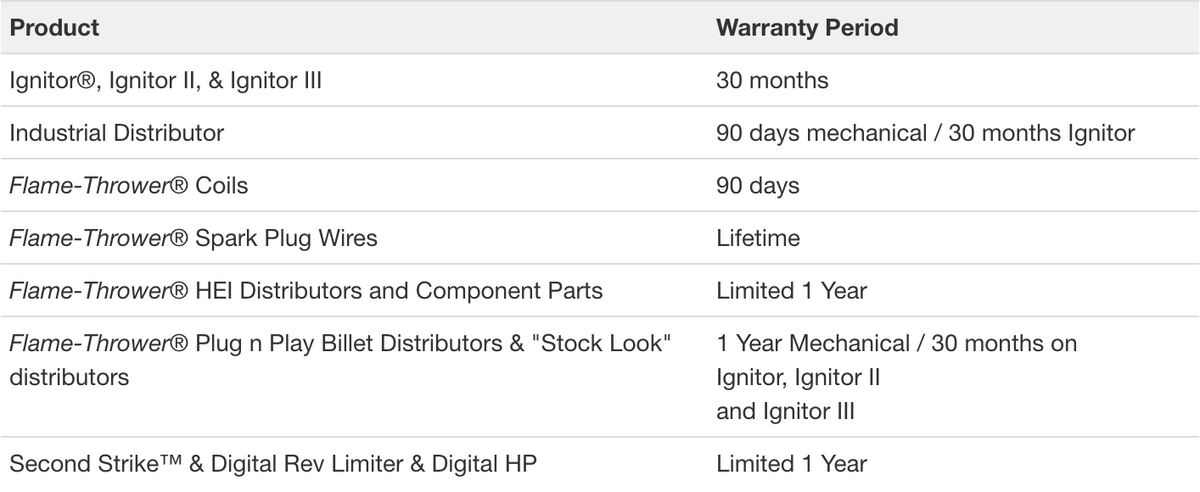
Limited Warranty
PerTronix, Inc. warrants to the original Purchaser that its products shall be free from defects in material and workmanship for a period, as specified above, from the day of purchase.
Should a part become defective it should be returned to the original selling retailer and must be accompanied with the sales receipt.
If there is no retailer in your area, call the factory for a return authorization number and return your part prepaid to the factory for inspection. The manufacturer reserves the right to repair or replace the alleged defective part and return the part freight collect.
What should I gap the spark plugs to?
Spark plug gap is somewhat subjective. Every engine responds differently to spark plug settings. We recommend that the gap be increased a maximum of .007" over the factory specification. This should not create any issue with service interval's or plug life, yet will enable you to take advantage of the added potential of the ignition system. It's important to read the plugs occasionally to insure that your changes do not adversely affect the engine performance.
What should the module air gap be?
Most of our Ignitor kits are not adjustable and are factory set to the appropriate air gap. Some kits do require setting the gap between the module and the magnet sleeve. In these cases we supple a clear plastic feeler gauge that measures 0.030". This is inserted between the module face and the magnet ring before tightening down the module. As a general rule, the gap can be set to a minimum of 0.010" and a maximum of 0.060". Any module gap between these two settings will provide the same results. The use of traditional steel feeling gauges will not create a problem with the module.
What type of applications can the Ignitor™ be used in?
Ignitor kits are available for the Automotive, Industrial, Marine and Agricultural industries. Automotive applications range from American Motors to Volvo’s covering most domestic and foreign vehicles. Our Marine applications include many popular and classic boats. Many kits are available for all types of Industrial and Agricultural equipment. Ignitor kits for 6 volt and 12 volt positive ground applications are also available. If your particular application is not listed in our online catalog, or distributor number cross reference, please create an application ticket with your details and one of our technicians will reply to you.
What type of gear is supplied on Flame-Thrower distributors?
Flame-Thrower distributors that utilize a gear, are equipped with harden steel gears. Depending on the application they range in hardness from 45C-55C Rockwell. These gears are generally compatible with flat tappet and hydraulic camshafts. For street roller and billet roller camshafts consult the camshaft manufacture for recommended distributor gear materiel. PerTronix offers bronze distributor gears for the most common applications.
What type of spark plug wires can I use with your Ignition system?
Its very important to verify that your spark plug wires are compatible with the ignition system, or any on-board electronics in general. Solid core wires have a copper or stainless steel conductor and generate excessive Electromagnetic Interference (EMI). This EMI can create confusion with electronics and ultimately damage them. With all PerTronix ignitions we recommend that a suppression style spark plug wire (also called carbon core) be used. The suppression wires do an excellent job of controlling the EMI with no degradation to the ignition performance.
If, you don't know how to identify the type of wire on the engine. Here's a articular written by our friends at Hot Rod Network showing pictures of the different wires. It should help with figuring out the spark plug wire being used on your engine. Keep in mind PerTronix ignitions need carbon-suppression, or spiral-wound wire:
https://www.hotrod.com/articles/1006rc-ignition-wiring/
What will happen if I leave the ignition switch on when the engine is not running?
With Ignitor electronic ignition systems, leaving the ignition switch in the run position when the engine is not running, can cause permanent damage to the ignition system, and related components. This does not apply to the accessory position of the ignition switch. Ignitor II and Ignitor III ignition systems have protections built into them that turn off the system prior to damage.
Will the Ignitor™ work with a shift interrupter on a boat?
The Ignitor is compatible with all shift interrupters on boats.
On OMC stern drive applications, with the OMC interrupter our "diode fix" will be needed. Click on the attachment below for the "diode fix" view the diagram.
View Diagram
If you have updated the OMC interrupter to a newer CDI Electronics interrupter. You will want to contact CDI electronic about the model interrupter being used. Let them know you are using a PerTronix Ignitor with the model CDI electronic interrupter be used. They will let you know if you need the diode fix. Most of the time with the CDI electronics interrupter the diode fix is not needed.
On Mercruiser interrupters no extra parts or wiring are needed. Just hook up the interrupter to it's normal location on the coil.
JBA Performance Exhaust
How long has JBA been making exhaust products?
JBA first started building headers and exhaust products in 1987. The first header designed was the smog legal “Shorty” for the 5.0L Mustang.
What kind of performance gains can I expect from my headers?
Typical performance gains with the addition of JBA Headers on a fuel injected V-8 will be anywhere from 10-25 horsepower and similar numbers for torque. For V-6 applications you will see a gain of 10-15 horsepower. How much performance you gain will depend on the condition of your vehicle and the upgrades you have already made. On supercharged applications you will see a more dramatic increase, as much as 40+ horsepower.
Will aftermarket equipment void my warranty?
No. This is a common and widely believed misconception. Most vehicle owners are not aware that federal law protects them: the Magnuson-Moss Warranty - Federal Trade Commission improvement Act of 1975. Basically, this law puts burden of proof that an aftermarket part caused something to fail on the vehicle manufacturer.
What is a JBA Firecone®?
Abrupt changes in manifold volume, such as the transition from primary tube to collector, causes turbulence and a drop in exhaust gas velocity. Turbulence equals restriction and velocity equals flow, so increased turbulence and reduced velocity are the last things you want in your exhaust system. The patented JBA Firecone® merge collector eases the transition helping to maintain the direction and speed of the exhaust flow. The result is a noticeable increase in power and efficiency. Most of these gains can be attributed to improved scavenging. The process of scavenging can be described as using exhaust pulses to siphon out spent gasses and draws in the fresh mixture during valve overlap. The effect is an increase in volumetric efficiency (more air in the cylinder) and a decrease in contamination from spent gasses.
What does "50 state smog legal" refer to?
Headers described as “smog legal” have been granted a C.A.R.B. (California Air Resources Board) exemption approval making that product legal for street driving use in all 50 states.
What finish is on JBA Headers?
JBA offers headers manufactured from either 409 or 304 Stainless Steel. 409SS is the same material that higher end modern car exhaust systems are made from. It offers high corrosion resistance (although it can turn reddish brown over time) and long-lasting durability. JBA offers our 409 headers in Raw Stainless, Silver Metallic Ceramic Coating and in some a Titanium Colored Ceramic. The ceramic coatings offer a more attractive finish that the raw headers and have the added performance benefits of lower under hood temperatures and increased performance due to higher exhaust velocity from holding the heat inside the header. 304SS is a higher quality Stainless Steel with less nickel content that is more expensive that offers better corrosion resistance and a nicer finish. JBA offers 304 Headers in Natural or Polished finishes.
What are the “slits” on the header flanges?
JBA Headers feature ultra thick 3/8” laser cut flanges. On these flanges you will see that the bolt-holes have a “slit”. This “slit” is created during the laser cutting process. It is not there for heat expansion reasons and it doesn't have an effect on the bolts ability to stay tight.
Will headers make my car louder?
Typically, JBA Headers will not make your vehicle noticeably louder. We use thick tubing that keeps the common exhaust noise associated with thin gauge long tube headers to a minimum. You may notice an improvement in the crispness of your exhaust note.
Does JBA make custom headers?
The answer is "sometimes". We are always looking for vehicles for New Header designs for cars and trucks that we don't offer products for, which can garner the car owner FREE Products. Click Here to see our current list of Vehicles Wanted. We occasionally get involved with Custom Application Headers if shop time is available. These Customer Headers are Not Cheap.
Will I lose torque if I install JBA Headers?
No. You will actually gain low-end torque. We design our headers with appropriately sized primary tubing to provide solid low-end torque gains and high RPM breathing ability for greater overall performance.